
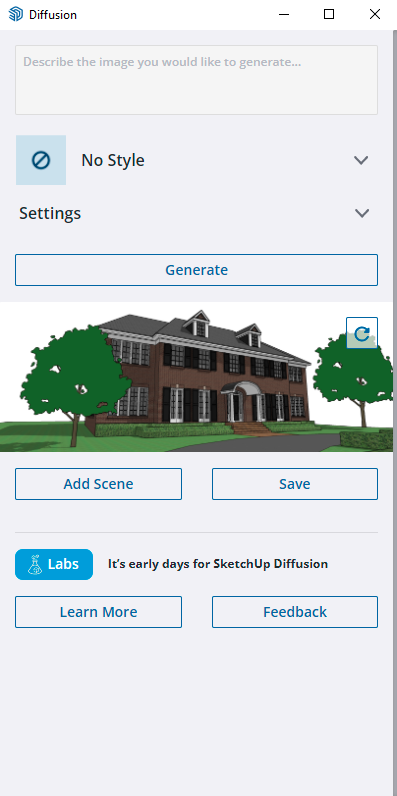
Sketchup Diffusion - Getting Started

AI at your fingertips!
Sketchup Diffusion is a new tool released by the Sketchup Labs team. AI is a hot topic now and if you don’t keep up then there’s a feeling that you might be left behind. It’s also easy to get overwhelmed by the influx of AI news and features, but fear not! Our friends over at the Sketchup Labs headquarters have made it nice and easy for even the most technologically stunted among us to create interesting, beautiful and thought-provoking images using AI!
WARNING: I am by no means an expert and I still have a lot to learn with this software, this is just a general overview of how to get started with SketchUp diffusion.
In this blog post, we will break down how to use this new tool. What things to look out for, what to avoid and how it can be a way to help your design process (and not control your design process!).
*image is not an accurate representation of using Sketchup Diffusion…

Step 1: Installing and Activating Diffusion
So how do you get started with Diffusion? First off you need to have an active SketchUp Go, Pro or Studio subscription. Like installing any other extension you need to first go to the extension warehouse (isn’t it fun that Sketchup uses spatial terms like Warehouse, it makes it feel very 3D..!).
Once in the warehouse, search for ‘diffusion’ and download.

Step 2: Setting up your model
For this tutorial, I will use a simple model that I have downloaded from the Sketchup warehouse. As it is December it feels crazy to not be a little Christmassy, so for this tutorial we’re going to focus on the house of Kevin McCallister himself. It’s the home alone house! A huge thanks to DannyDijk for modelling this house. We’ll be using the ‘Home Alone Staircase’ model for our interior shots. Thanks to user ‘R’ for making this!
Once you have your modell it is time to set up some scenes, do this as you usually would when creating your Sketchup images to present to clients. You don't necessarily need scenes to get started with Diffusion as it’ll use whatever view you currently have open, but it’s always good practice to make nice scenes. Don’t be afraid of making lots of scenes, some will work better than others with diffusion (often for no clear reason to a layman like me..!)
TIP: When setting up your camera views be careful to not mess around with your FIELD OF VIEW too much. I have noticed that you need to stick to the SketchUp regular FOV of 35.00 deg diffusion software to generate images for you. Keep it simple for the robots! Don't use 2 point perspective, it doesn't like it.
TIP: The shadow direction that you include in your scene can also influence your images, so be sure to take some time to set up your location correctly and choose a time of day that shows nice shadows and depth to your project.
TIP: Diffusion works well with trees. I have experimented with including trees in the prompt but as we all know, a picture (or in this case a 3D model) paints a thousand words. I highly recommend using an extension like 3D ArcStudio 3D Tree Maker and placing some trees in your model. They can be extremely heavy so remember to put them in a separate layer so you don't slow down your model speed. You can use 2D trees if you want to keep your model size lower - that will also work well. Test it out!

Our starting exterior scene. Using 2D Trees and shadow.
Step 3: The diffusion interface.
Diffusion is great for testing. Think of it as another colleague, there are many times when I feel stumped by a project and will turn to my colleague and he’ll offer a suggestion that gets my brain going. It can be as simple as ‘Why not try this colour?’ or ‘Maybe a wooden facade would work better here?’. It is best to approach diffusion in this way, I’ll give some examples.
Set up your exterior shot (or go to the scene that you’ve already set up), and turn on your shadows. Once happy with the view we’ll go ahead and click on the diffusion icon (see picture). A window will pop up.

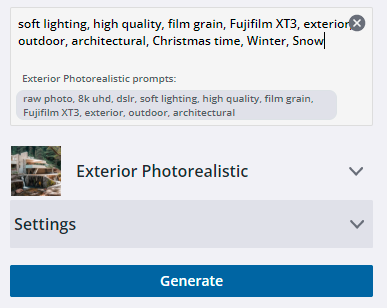
The first thing you’re going to see is the prompt window -
This will say ‘Describe the image you would like to generate…’. It is tempting to start writing away but HOLD YOUR HORSES immediately. Instead, we must begin with choosing our style - the reason for this is that the Sketchup Lab teams have kindly included recommended prompts for the different styles. These are a great starting point for us. I have listed below the prompts that they recommend, you can come back to these later -
Exterior Photorealistic prompts:
raw photo, 8k uhd, dslr, soft lighting, high quality, film grain, Fujifilm XT3, exterior, outdoor, architectural
Interior Photorealistic prompts:
raw photo, 8k uhd, dslr, soft lighting, high quality, film grain, Fujifilm XT3, interior, indoor, architectural
Aerial Masterplan prompts:
Aerial rendering in a masterplan style, reminiscent of comprehensive urban designs with a touch of futurism
Pencil Sketch prompts:
sketch, an architectural sketch, pencil and paper, high quality
Watercolor prompts:
traditional media, painting, watercolor, ink, shaky lines, architectural style, brush strokes, ink stains, soft edges, white space around the frame
Illustration prompts:
paper cut-out, photo-collage, flat textures, post-digital, harmonious pastel hues, textured collages, muted overlays, contemporary, tactile touch, traditional blended mediums, stylized urban mural
Clay Model prompts:
ambient occlusion, arctic white, clay model, monochrome, soft shadow, short shadow
but what is a prompt?
Text prompts are powerful tools for generating AI imagery. By giving specific instructions or descriptions, we can use AI tools to create realistic and varied visuals. For example, we can request a landscape painting, a digital character, or a futuristic cityscape. Text prompts help us convey our ideas to the AI model. This lets us explore possibilities and experiment with different styles, moods, and compositions.
I highly recommend spending some time on a website like https://freeflo.ai/ - here you will find many images that have been generated by the AI image generator MidJourney. While not the same as Sketchup Diffusion is it helpful to begin to understand how prompt writing works.
This descriptive style of writing is a great tool to have, notice how the prompts speak a lot about lighting and the tones of the image. Essentially, think about how you want the space to feel, and then work backwards from that. If you want an image of a cosy living room then just prompting ‘cosy living room’ isn’t going to be enough. Think about how you want the light to feel, what smells you want (old wood and a fireplace perhaps) - and write all of these in! There’s no definitive secret to the perfect prompt yet, so practice practice practice.

We shall begin by choosing the style ‘Exterior Photorealistic’
We then write in our prompts, for this image I have used some of the suggested general prompts and then added some of my own. I went for ‘soft lighting, high quality, film grain, Fujifilm XT3, exterior, outdoor, architectural, Christmas time, winter, snowfall’.
This is our first image just to show you what diffusion is capable of. We’ll get to how it can be a design tool later.
At this stage do not touch the settings, we will come to those in the next step!
LETS HIT GENERATE AND SEE WHAT HAPPENS!

Diffusion will always generate three alternatives for you. Click on them to expand the image and you then have two options with each -

If you select Add Scene then it will add this image to a scene that you can view directly in your SketchUp model. If you choose to Save then you can download the image to your computer.
From this…

To this!
Step 4: Designing with diffusion and using Settings -
Now let us imagine a scenario where we need to try some different material or massing options. Perhaps when Kevin realises he has been left home alone he considers it a perfect time to do a remodel of the house. Probably would have saved him a lot of trouble with those pesky robbers if his house was a building site. Let's say that we want the house to be more modern, and with a wooden facade. A ski-chalet feeling. To do this we’ll add to the prompts and also we will adjust the settings.
The settings tell Diffusion how much weight it should give to its two inputs. It has the model geometry coming from one side, and the prompt that you’ve written coming from the other. Turn down the influence of the model geometry and it’ll be able to make bigger adjustments to the overall form of your project. Turn down the prompt influence and it’ll rely more on the model that you’ve made. Think of it like a hand sketching or sketch modelling process that you would do before the computer. When you’re sketching quickly and throwing ideas around then it’s far less necessary to be precious about each design, it is better to try multiple different options - in this case, that means turning down the amount of Model Geometry and turning up the Prompt Influence.

Here we have asked diffusion to put more importance on the prompt influence and less on the model geometry.

The Interior View

Step 5: Interior shot
There are many different styles that you can choose from, but in this short tutorial, we will just look at the interior and exterior photorealistic style settings.Now we’re going to make an interior scene view. To do this I am using the Home Alone staircase model that I downloaded from the SketchUp Warehouse. I have set up a view looking up the stairs.
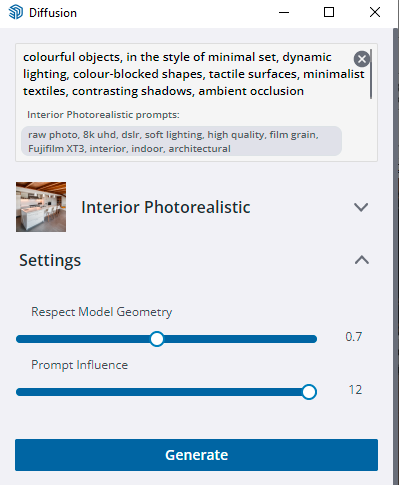
As I mentioned before it’s great to find inspiration for image prompts, and to see what other people have written. Lets say for this image we want to re-imagine the staircase and corridor from the perspective of a child designing it. Again, Kevin wants more colour and more life!
We will use the prompt
“a staircase photograph in a colourful room with some colourful objects, in the style of minimal set, dynamic lighting, colour-blocked shapes, tactile surfaces, minimalist textiles, contrasting shadows, ambient occlusion”
Notice how I turned down the Respect Model Geometry slightly and upped the prompt influence.

Look at that colour!

Thanks for reading the blog post. I’ll leave the comments open in case you have any questions!